1. Shiro简介
1.1 Shiro基本功能点
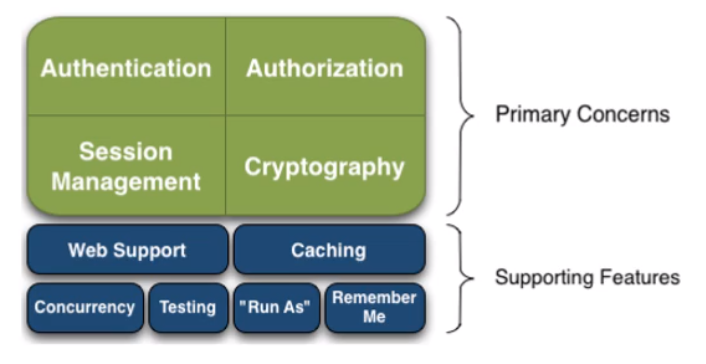
1.2 Shiro架构
(1)从外部来看Shiro,即从应用程序角度来观察如何使用Shiro完成工作
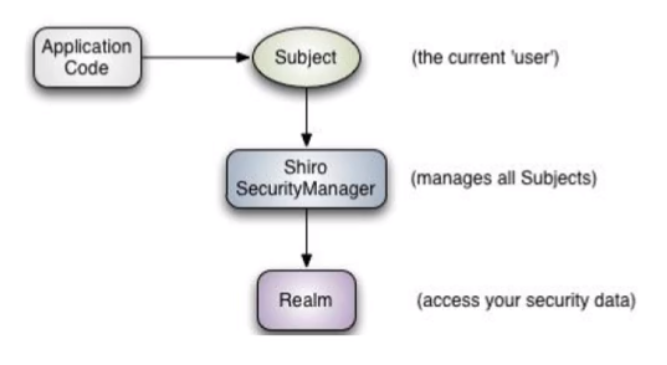
Subject:应用代码直接交互的对象是 Subject,也就是说 Shiro 的对外 API 核心就是 Subject 。 Subject 代表了当前“用户”,这个用户不一定是一个具体的人,与当前应用交互的任何东西都是 Subject,如网络爬虫,机器人等;与 Subject 的所有交互都会委给Securitymanager;
Subject 其实是一个门面,SecurityManager 才是实际的执行者;
SecurityManager:安全管理器;即所有与安全有关的操作都会与 SecurityManager 交互;且其管理着所有 Subject;可以看出它是 Shiro 的核心,它负责与 Shiro 的其他组件进行交互,它相当于 Spring MVC 中 DispatcherServlet 的角色
Realm:Shiro 从 Realm 获取安全数据(如用户、角色、权限),就是说 SecurityManager 要验证用户身份,那么它需要从 Realm 获取相应的用户进行比较以确定用户身份是否合法;也需要从 Realm 得到用户相应的角色/权限进行验证用户是否能进行操作;可以把 Realm 看成 DataSource
(2)Shiro内部
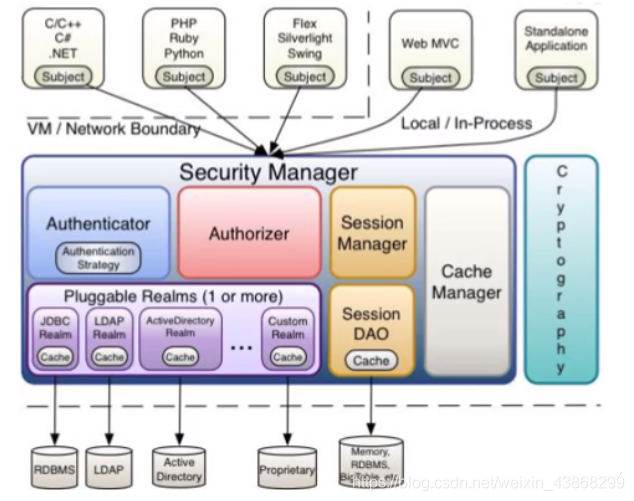
Subject:任何可以与应用交互的“用户”;
SecurityManager:相当于 Spring MVC 中的 DispatcherServlet;是 Shiro 的心脏;
所有具体的交互都通过 SecurityManager 进行控制;它管理着所有 Subject 、且负责进行认证、授权、会话及缓存的管理。
Authenticator:负责 Subject 认证,是一个扩展点,可以自定义实现;可以使用认证策略( Authentication Strategy ),即什么情况下算用户认证通过了;
Authorizer:授权器、即访问控制器,用来决定主体是否有权限进行相应的操作;即控制着用户能访问应用中的哪些功能;
Realm:可以有1个或多个 Realm,可以认为是安全实体数据源,即用于获取安全实体的;可以是 JDBC 实现,也可以是内存实现等等;由用户提供;所以一般在应用中都需要实现自己的 Realm;
SessionManager:管理 Session 生命周期的组件;而 Shiro 并不仅仅可以用在 Web 环境,也可以用在如普通的 JavaSE 环境;
CacheManager:缓存空制器,来管理如用户、角色、权限等的缓存;因为这些数据基本上很少改变,放到缓存中后可以提高访问的性能;
Cryptography:密码模块,Shiro 提高了一些常见的加密组件用于如密码加/解密。
2. 集成Spring
加入Spring和Shiro的jar包,配置Spring和Spring MVC
2.1 添加Shiro依赖
1
2
3
4
5
6
7
8
9
10
11
12
13
14
15
16
17
18
19
20
21
22
23
24
25
26
27
28
29
30
31
32
33
34
35
36
37
38
39
40
41
42
43
44
45
46
47
| <dependency>
<groupId>org.apache.shiro</groupId>
<artifactId>shiro-spring</artifactId>
<version>1.3.2</version>
</dependency>
<dependency>
<groupId>org.apache.shiro</groupId>
<artifactId>shiro-all</artifactId>
<version>1.3.2</version>
</dependency>
<dependency>
<groupId>org.apache.shiro</groupId>
<artifactId>shiro-core</artifactId>
<version>1.3.2</version>
</dependency>
<dependency>
<groupId>org.apache.shiro</groupId>
<artifactId>shiro-web</artifactId>
<version>1.3.2</version>
</dependency>
<dependency>
<groupId>org.slf4j</groupId>
<artifactId>slf4j-api</artifactId>
<version>1.6.1</version>
</dependency>
<dependency>
<groupId>org.slf4j</groupId>
<artifactId>slf4j-log4j12</artifactId>
<version>1.6.1</version>
<scope>compile</scope>
</dependency>
<dependency>
<groupId>org.slf4j</groupId>
<artifactId>slf4j-nop</artifactId>
<version>1.6.1</version>
<scope>compile</scope>
</dependency>
<dependency>
<groupId>org.apache.shiro</groupId>
<artifactId>shiro-ehcache</artifactId>
<version>1.3.2</version>
</dependency>
<dependency>
<groupId>log4j</groupId>
<artifactId>log4j</artifactId>
<version>1.2.12</version>
</dependency>
|
2.2 配置webapp目录下的web.xml
配置 Shiro 的 shiroFilter
1
2
3
4
5
6
7
8
9
10
11
12
13
14
15
16
17
18
19
20
21
22
|
<filter>
<filter-name>shiroFilter</filter-name>
<filter-class>org.springframework.web.filter.DelegatingFilterProxy</filter-class>
<init-param>
<param-name>targetFilterLifecycle</param-name>
<param-value>true</param-value>
</init-param>
</filter>
<filter-mapping>
<filter-name>shiroFilter</filter-name>
<url-pattern>/*</url-pattern>
</filter-mapping>
<listener>
<listener-class>org.springframework.web.context.ContextLoaderListener</listener-class>
</listener>
|
2.3 在Spring配置文件中配置Shiro
(1)spring配置文件
1
2
3
4
5
6
7
8
9
10
11
12
13
14
15
16
17
18
19
20
21
22
23
24
25
26
27
28
29
30
31
32
33
34
35
36
37
38
39
40
41
42
43
44
45
46
47
48
49
50
51
52
53
54
55
56
57
58
59
60
| <?xml version="1.0" encoding="UTF-8"?>
<beans xmlns="http://www.springframework.org/schema/beans"
xmlns:context="http://www.springframework.org/schema/context"
xmlns:xsi="http://www.w3.org/2001/XMLSchema-instance"
xsi:schemaLocation="
http://www.springframework.org/schema/beans
https://www.springframework.org/schema/beans/spring-beans.xsd
http://www.springframework.org/schema/context
https://www.springframework.org/schema/context/spring-context.xsd">
<bean id="securityManager" class="org.apache.shiro.web.mgt.DefaultWebSecurityManager">
<property name="cacheManager" ref="cacheManager"/>
</bean>
<bean id="cacheManager" class="org.apache.shiro.cache.ehcache.EhCacheManager">
<property name="cacheManagerConfigFile" value="classpath:ehcache.xml"/>
</bean>
<bean id="jdbcRealm" class="com.ShiroDemo.realms.ShiroRealm"></bean>
<bean id="lifecycleBeanPostProcessor" class="org.apache.shiro.spring.LifecycleBeanPostProcessor"/>
<bean depends-on="lifecycleBeanPostProcessor" class="org.springframework.aop.framework.autoproxy.DefaultAdvisorAutoProxyCreator"/>
<bean class="org.apache.shiro.spring.security.interceptor.AuthorizationAttributeSourceAdvisor">
<property name="securityManager" ref="securityManager"/>
</bean>
<bean id="shiroFilter" class="org.apache.shiro.spring.web.ShiroFilterFactoryBean">
<property name="securityManager" ref="securityManager"/>
<property name="loginUrl" value="/login.jsp"/>
<property name="successUrl" value="/list.jsp"/>
<property name="unauthorizedUrl" value="/unauthorized.jsp"/>
<property name="filterChainDefinitions">
<value>
/login.jsp = anon
/** = authc
</value>
</property>
</bean>
</beans>
|
(2)ehcache依赖
1
2
3
4
5
6
|
<dependency>
<groupId>org.apache.shiro</groupId>
<artifactId>shiro-ehcache</artifactId>
<version>1.3.2</version>
</dependency>
|
(3)ehcache配置文件
1
2
3
4
5
6
7
8
9
10
11
12
13
14
15
16
17
18
19
20
21
22
23
24
25
26
27
28
29
30
31
32
33
34
35
36
37
38
39
40
41
42
43
44
45
46
47
48
49
50
51
52
53
54
55
56
57
58
59
60
| <?xml version="1.0" encoding="UTF-8"?>
<ehcache updateCheck="false" name="shirocache">
<diskStore path="java.io.tmpdir"/>
<defaultCache
maxElementsInMemory="10000"
maxElementsOnDisk="0"
eternal="true"
overflowToDisk="true"
diskPersistent="false"
timeToIdleSeconds="0"
timeToLiveSeconds="0"
diskSpoolBufferSizeMB="50"
diskExpiryThreadIntervalSeconds="120"
memoryStoreEvictionPolicy="LFU"
/>
<cache name="passwordRetryCache"
maxEntriesLocalHeap="2000"
eternal="false"
timeToIdleSeconds="3600"
timeToLiveSeconds="0"
overflowToDisk="false"
statistics="true">
</cache>
<cache name="authorizationCache"
maxEntriesLocalHeap="2000"
eternal="false"
timeToIdleSeconds="3600"
timeToLiveSeconds="0"
overflowToDisk="false"
statistics="true">
</cache>
<cache name="authenticationCache"
maxEntriesLocalHeap="2000"
eternal="false"
timeToIdleSeconds="3600"
timeToLiveSeconds="0"
overflowToDisk="false"
statistics="true">
</cache>
<cache name="shiro-activeSessionCache"
maxEntriesLocalHeap="2000"
eternal="false"
timeToIdleSeconds="3600"
timeToLiveSeconds="0"
overflowToDisk="false"
statistics="true">
</cache>
<cache name="shiro_cache"
maxElementsInMemory="2000"
maxEntriesLocalHeap="2000"
eternal="false"
timeToIdleSeconds="0"
timeToLiveSeconds="0"
maxElementsOnDisk="0"
overflowToDisk="true"
memoryStoreEvictionPolicy="FIFO"
statistics="true">
</cache>
</ehcache>
|
(4)自定义Realm
自定义Realm,实现 org.apache.shiro.realm.Realm 接口
1
2
3
4
5
6
7
8
9
10
11
12
13
14
15
16
17
18
19
20
21
22
23
| package com.ShiroDemo.realms;
import org.apache.shiro.authc.AuthenticationException;
import org.apache.shiro.authc.AuthenticationInfo;
import org.apache.shiro.authc.AuthenticationToken;
import org.apache.shiro.realm.Realm;
public class ShiroRealm implements Realm {
@Override
public String getName() {
return null;
}
@Override
public boolean supports(AuthenticationToken authenticationToken) {
return false;
}
@Override
public AuthenticationInfo getAuthenticationInfo(AuthenticationToken authenticationToken) throws AuthenticationException {
return null;
}
}
|
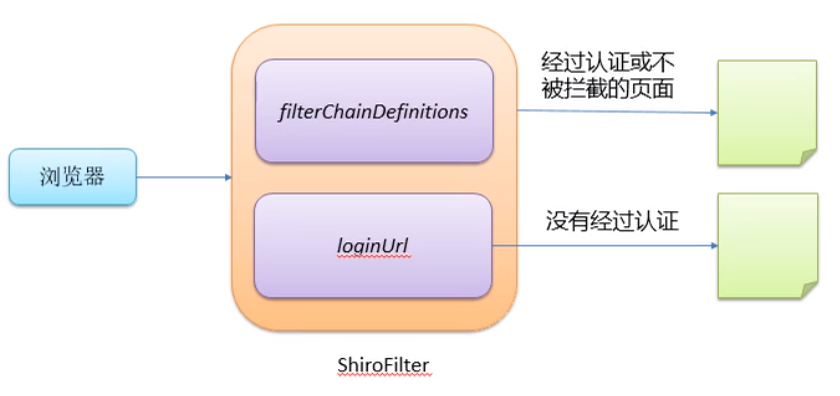
3. ShiroFilter的工作原理
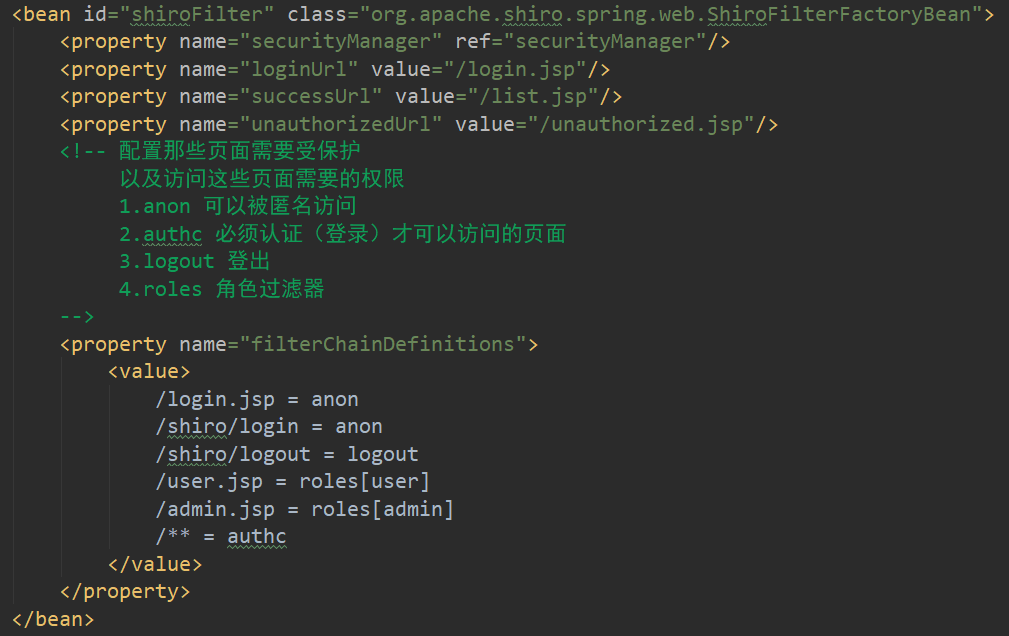
4. URL权限控制
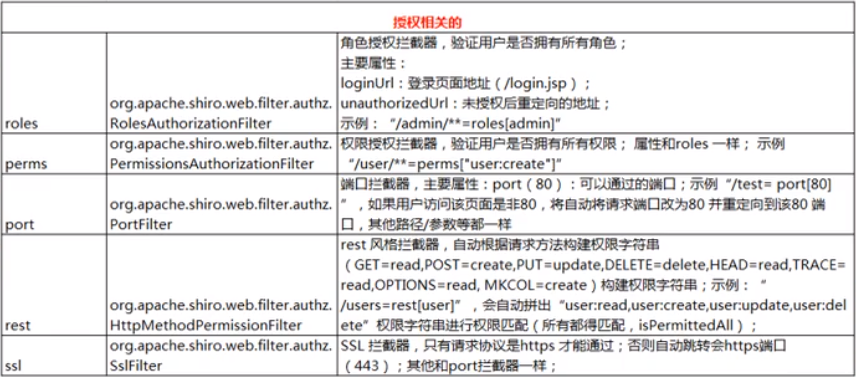
[urls] 部分的配置,其格式是:“ url = 拦截器 [参数] ,拦截器 [参数] ”;
如果当前请求的 url 匹配 [urls] 部分的某个 url 模式,将会执行其配置的拦截器。
anon(anonymous)拦截器表示匿名访问(即不需要登录即可访可)
autho(authentication)拦截器表示需要身份认证通过后才能访问
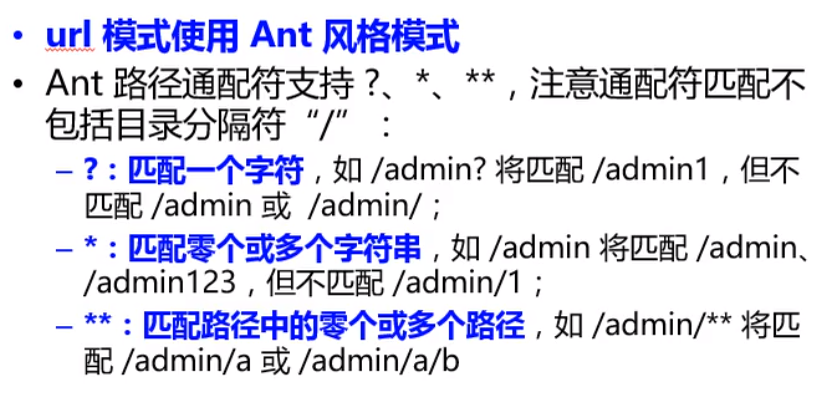
URL匹配模式
URL匹配顺序

5. 认证
5.1 认证流程
1、获取当前的 Subject ,调用 SecurityUtils. getSub]ect();
2、调用 subject 的 isAuthenticated()测试当前的用户是否已经被认证,即是否已经登录;
3、若没有被认证,则把用户名和密码封装为 UsernamePasswordToken对象:
1)前端页面创建一个表单页面;
2)把请求提交到 Spring MVC 的 Handler ;
3)获取用户名和密码;
4、调用 subject 的 login(AuthenticationToken) 方法执行登录;
5、自定义 Realm 的方法,从数据库中获取对应的记录,返回给 Shiro:
1)实际上需要继承 org.apache.shiro.realm.AuthenticatingRealm 类;
2)实现 doGetAuthenticationInfo(AuthenticationToker)方法;
6、由 shiro 完成对密码的比对,通过 AuthenticatingRealm 的 credentalsMathcher 属性来进行密码的比对。
5.2 代码
(1)ShiroRealm
1
2
3
4
5
6
7
8
9
10
11
12
13
14
15
16
17
18
19
20
21
22
23
24
25
26
27
28
29
30
31
32
33
34
35
36
37
38
39
40
41
42
43
44
45
46
47
48
49
50
51
52
53
54
55
56
57
58
59
60
61
62
63
64
65
| package com.ShiroDemo.realms;
import org.apache.shiro.authc.*;
import org.apache.shiro.authz.AuthorizationInfo;
import org.apache.shiro.authz.SimpleAuthorizationInfo;
import org.apache.shiro.crypto.hash.SimpleHash;
import org.apache.shiro.realm.AuthenticatingRealm;
import org.apache.shiro.subject.PrincipalCollection;
import org.apache.shiro.util.ByteSource;
import java.util.HashSet;
import java.util.Set;
public class ShiroRealm extends AuthenticatingRealm {
@Override
protected AuthenticationInfo doGetAuthenticationInfo(AuthenticationToken token) throws AuthenticationException {
UsernamePasswordToken upToken = (UsernamePasswordToken) token;
String username = upToken.getUsername();
System.out.println("前端表单输入的username:" + username);
System.out.println("从数据库中获取username:" + username + "所对应的数据");
if("unknow".equals(username)){
throw new UnknownAccountException("用户不存在");
}
if("monster".equals(username)){
throw new LockedAccountException("用户被锁定");
}
Object principal = username;
Object credentials = "098d2c478e9c11555ce2823231e02ec1";
String realmName = getName();
ByteSource credentialsSalt = ByteSource.Util.bytes(username);
SimpleAuthenticationInfo info = null;
info = new SimpleAuthenticationInfo(principal,credentials,credentialsSalt,realmName);
return info;
}
public static void main(String args[]){
String hashAlgorithmName = "MD5";
Object credentials = "123456";
Object salt = ByteSource.Util.bytes("user");
int hashIterations = 1024;
Object result = new SimpleHash(hashAlgorithmName,credentials,salt,hashIterations);
System.out.println(result);
}
}
|
(2)ShiroHandler
1
2
3
4
5
6
7
8
9
10
11
12
13
14
15
16
17
18
19
20
21
22
23
24
| @Controller
@RequestMapping("shiro")
public class ShiroHandler {
@RequestMapping("login")
public String login(@RequestParam("username") String username,@RequestParam("password") String password){
Subject subject = SecurityUtils.getSubject();
if(!subject.isAuthenticated()){
UsernamePasswordToken token = new UsernamePasswordToken(username, password);
token.setRememberMe(true);
try{
subject.login(token);
}catch (AuthenticationException ae){
System.out.println("登录失败:" + ae.getMessage());
}
}
return "redirect:list.jsp";
}
}
|
(3)Spring配置文件
指定加密算法和加密次数,替换当前Realm的 credentialsMatcher 属性,直接使用 HashedCredentialsMatcher对象,并设置加密算法
1
2
3
4
5
6
7
8
| <bean id="jdbcRealm" class="com.ShiroDemo.realms.ShiroRealm">
<property name="credentialsMatcher">
<bean class="org.apache.shiro.authc.credential.HashedCredentialsMatcher">
<property name="hashAlgorithmName" value="MD5"></property>
<property name="hashIterations" value="1024"></property>
</bean>
</property>
</bean>
|
如何使用MD5盐值加密
1)在 doGetAuthenticationInfo 方法返回值创建 SimpleAuthenticationInfo 对象的时候,需要使用 SimpleAuthenticationInfo (principal, credentials, credentialsSalt, realmName) 构造器
2)使用 Bytesource.Util.bytes() 来计算盐值
3)盐值需要唯ー,一般使用随机字符串或 user id
4)使用 new SimpleHash(hashAlgorithmName, credentials, salt, hashiterations) 来计算盐值加密后的密码的值
5.3 多Realm验证
如果用户数据存储在多个数据库,数据库之间可能使用的加密算法不同,这时候就涉及到多Realm的验证策略
在上面一个Realm的前提下,再新建一个Realm,新Realm使用SHA1加密
(1)SecondRealm
1
2
3
4
5
6
7
8
9
10
11
12
13
14
15
16
17
18
19
20
21
22
23
24
25
26
27
28
29
30
31
32
33
34
35
36
37
38
39
40
41
42
43
44
45
46
47
48
49
50
51
52
53
54
55
56
57
58
59
60
61
62
63
64
65
66
| package com.ShiroDemo.realms;
import org.apache.shiro.authc.*;
import org.apache.shiro.crypto.hash.SimpleHash;
import org.apache.shiro.realm.AuthenticatingRealm;
import org.apache.shiro.util.ByteSource;
public class SecondRealm extends AuthenticatingRealm {
@Override
protected AuthenticationInfo doGetAuthenticationInfo(
AuthenticationToken token) throws AuthenticationException {
System.out.println("[SecondeRealml] doGetAuthenticationInfo:" + token);
UsernamePasswordToken upToken = (UsernamePasswordToken) token;
String username = upToken.getUsername();
System.out.println("前端username:" + username);
System.out.println("从数据库中获取username:" + username + "所对应的数据");
if("unknow".equals(username)){
throw new UnknownAccountException("用户不存在");
}
if("monster".equals(username)){
throw new LockedAccountException("用户被锁定");
}
Object principal = username;
Object credentials = null;
if("admin".equals(username)){
credentials = "ce2f6417c7e1d32c1d81a797ee0b499f87c5de06";
}else if("user".equals(username)){
credentials = "073d4c3ae812935f23cb3f2a71943f49e082a718";
}
String realmName = getName();
ByteSource credentialsSalt = ByteSource.Util.bytes(username);
SimpleAuthenticationInfo info = null;
info = new SimpleAuthenticationInfo("SecondRealm",credentials,credentialsSalt,realmName);
return info;
}
public static void main(String args[]){
String hashAlgorithmName = "SHA1";
Object credentials = "123456";
Object salt = ByteSource.Util.bytes("admin");
int hashIterations = 1024;
Object result = new SimpleHash(hashAlgorithmName,credentials,salt,hashIterations);
System.out.println(result);
}
}
|
(2)Spring配置文件
配置两个 Realm 的 bean,并放入 authenticator 认证器中,在 securityManager 中添加 authenticator
1
2
3
4
5
6
7
8
9
10
11
12
13
14
15
16
17
18
19
20
21
22
23
24
25
26
27
28
29
30
31
32
| <bean id="securityManager" class="org.apache.shiro.web.mgt.DefaultWebSecurityManager">
<property name="cacheManager" ref="cacheManager"/>
<property name="authenticator" ref="authenticator"/>
</bean>
<bean id="jdbcRealm" class="com.ShiroDemo.realms.ShiroRealm">
        <property name="credentialsMatcher">
            <bean class="org.apache.shiro.authc.credential.HashedCredentialsMatcher">
                <property name="hashAlgorithmName" value="MD5"></property>
                <property name="hashIterations" value="1024"></property>
            </bean>
        </property>
</bean>
<bean id="secondRealm" class="com.ShiroDemo.realms.SecondRealm">
<property name="credentialsMatcher">
<bean class="org.apache.shiro.authc.credential.HashedCredentialsMatcher">
<property name="hashAlgorithmName" value="SHA1"></property>
<property name="hashIterations" value="1024"></property>
</bean>
</property>
</bean>
<bean id="authenticator" class="org.apache.shiro.authc.pam.ModularRealmAuthenticator">
<property name="realms">
<list>
<ref bean="jdbcRealm"/>
<ref bean="secondRealm"/>
</list>
</property>
</bean>
|
5.4 认证策略 —— AuthenticationStrategy
AuthenticationStrategy 接口的默认实现:
FirstSuccessfulStrategy:只要有一个 Realm 验证成功即可,只返回第一个 Realm 身份验证成功的认证信息,其他的忽略;
AtLeastOneSuccessfulStrategy:只要有一个 Realm 验证成功即可,和 FirstSuccessfulStrategy 不同,将返回所有 Realm 身份验证成功的认证信息;
AllSuccessfulStrategy:所有 Realm 验证成功才算成功,且返回所有 Realm 身份验证成功的认证信息,如果有一个失败就失败了。
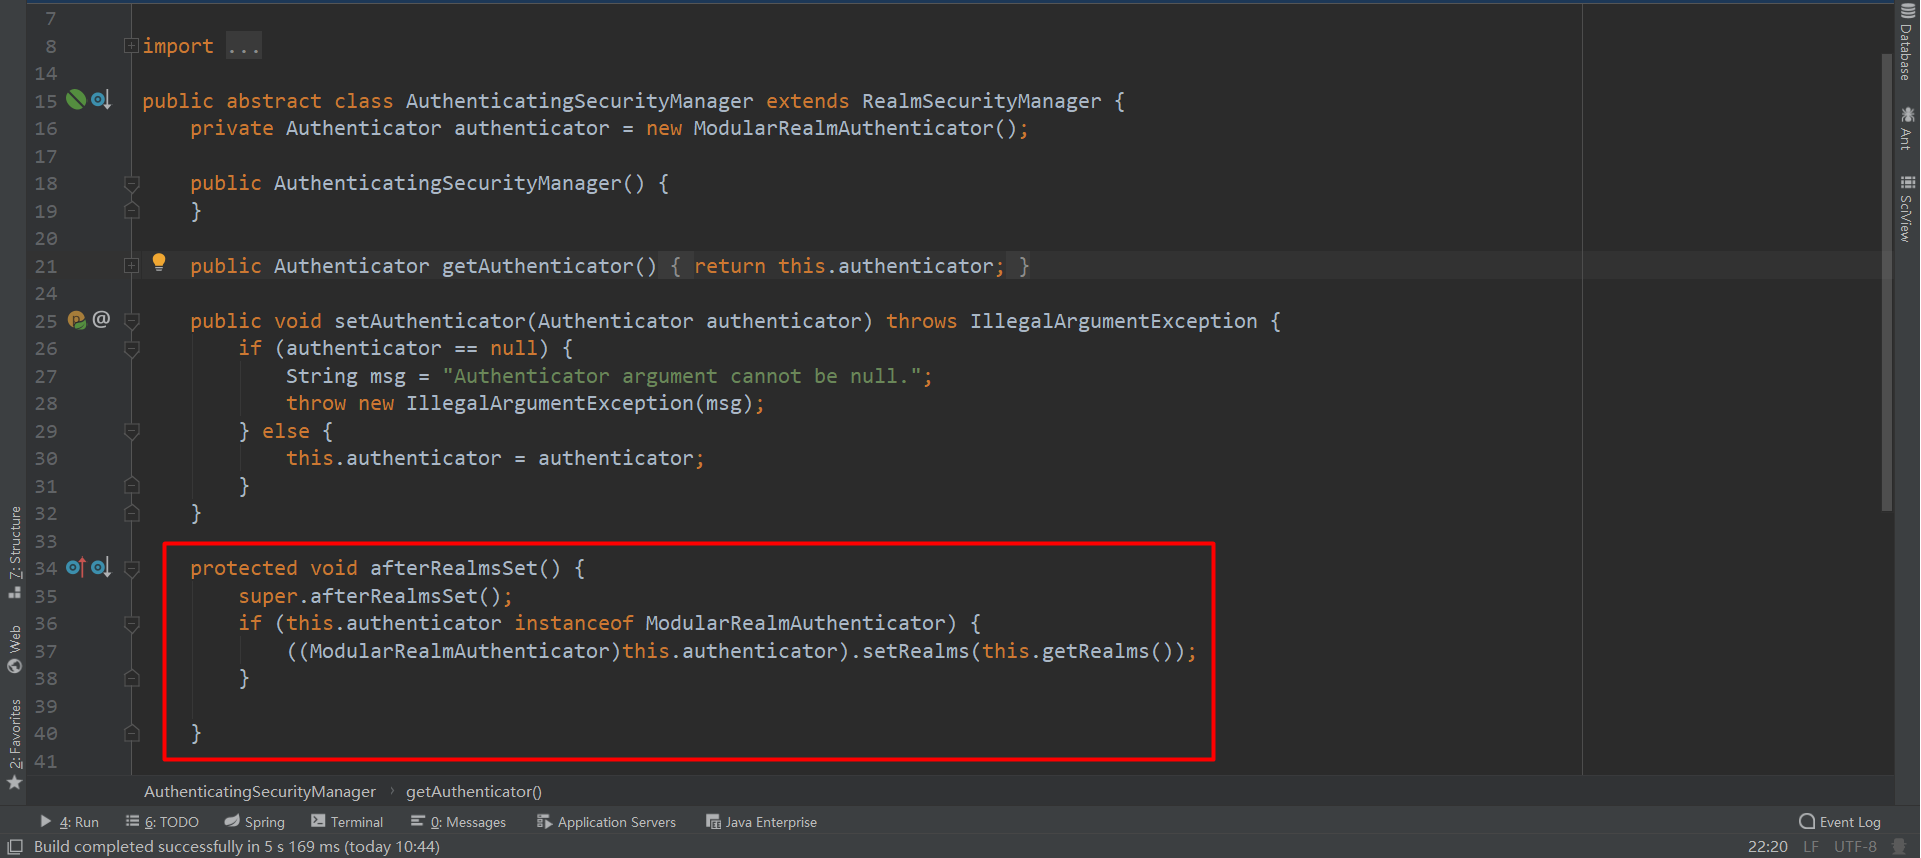
ModularRealmAuthenticator 默认是 AtLeastOneXuccessfulStrategy 策略
在Spring配置文件中的 authenticator 认证器中配置认证策略 authenticationStrategy
1
2
3
4
5
6
7
8
9
10
11
12
13
|
<bean id="authenticator" class="org.apache.shiro.authc.pam.ModularRealmAuthenticator">
<property name="realms">
<list>
<ref bean="jdbcRealm"/>
<ref bean="secondRealm"/>
</list>
</property>
<property name="authenticationStrategy">
<bean class="org.apache.shiro.authc.pam.AllSuccessfulStrategy"/>
</property>
</bean>
|
6. 授权
授权,也叫访问控制,即在应用中控制谁访问哪些资源(如访问页面/编辑数据/页面操作等)。在授权中需了解的几个关键对象:主体(Subject)、资源(Resource)、权限(Permission)、角色(Role)。
主体(Subject):访问应用的用户,在 Shiro 中使用 Subject 代表该用户。用户只有授权后才允许访可相应的资源。
资源(Resource):在应用中用户可以访问的 URL,比如访问 JSP 页面、查看/编辑某些数据、访问某个业务方法、打印文本等等都是资源。用户只有授权后才能访问。
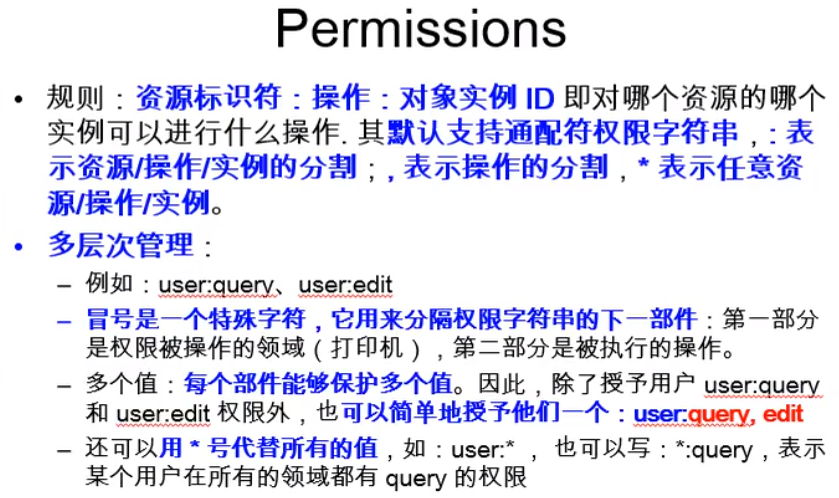
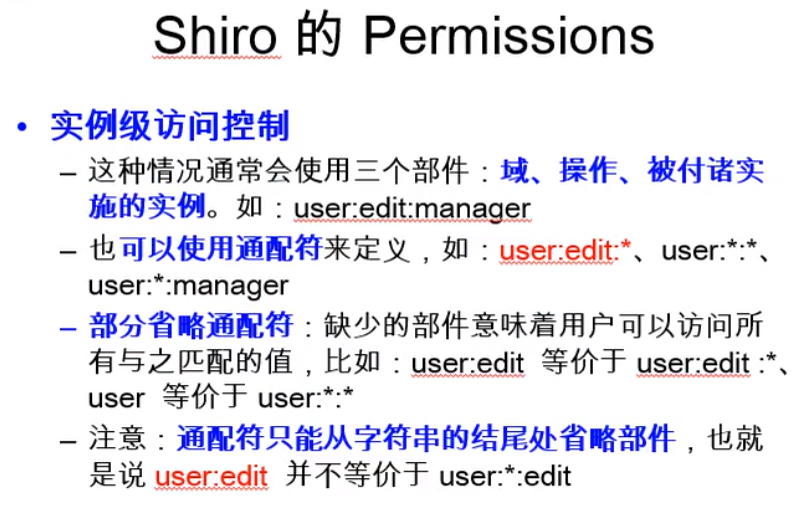
权限(Permission):安全策略中的原子授权单位,通过权限我们可以表示在应用中用户有没有操作某个资源的权力。即权限表示在应用中用户能不能访向某个资源,如:访问用户列表页面,查看/新增/修改/删除用户数据(即很多时候都是CRUD(増查改删)式权限控制)等。权限代表了用户有没有操作某个资源的权利,即反映在某个资源上的操作允不允许。
Shiro 支持粗粒度权限(如用户模块的所有权限)和细粒度权限(操作某个用户的权限,即实例级别的)
角色(Role):权限的集合,一般情况下会予用户角色而不是权限,即这样用户可以拥有一组权限,赋予权限时比较方便。典型的如:项目经理、技术总监、CTO、开发工程师等都是角色,不同的角色拥有一组不同的权限。
6.1 授权方式
Shiro 支持三种方式的授权:
- 编程式:通过写 if/else 授权代码块完成
- 注解式:通过在执行的 Java 方法上放置相应的注解完成,没有权限将抛出相应的异常
- JSP/GSP 标签:在 JSP/GSP 页面通过相应的标签完成
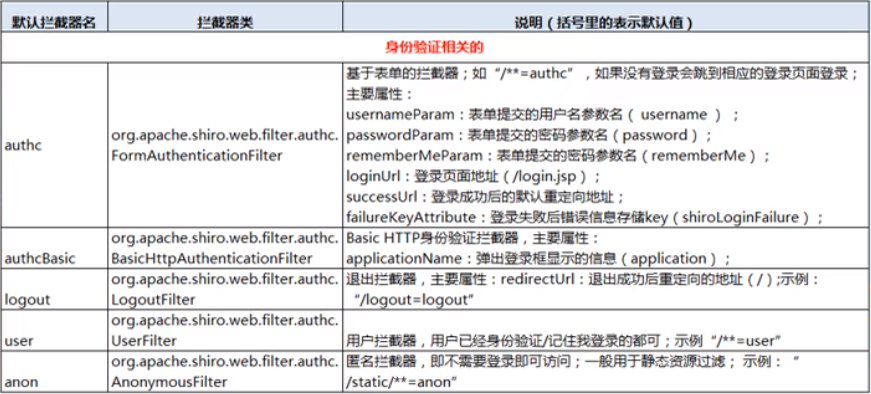
(1)身份验证相关
(2)授权相关
(3)其他

6.2 编程式授权配置
使用Shiro进行授权的时候 securityManager 需要使用到 Realm,所以我们需要把上面在 authenticator 中配置的 Realm 配置到 securityManager 中
1
2
3
4
5
6
7
8
9
10
11
| <bean id="securityManager" class="org.apache.shiro.web.mgt.DefaultWebSecurityManager">
<property name="cacheManager" ref="cacheManager"/>
<property name="authenticator" ref="authenticator"/>
<property name="realms">
<list>
<ref bean="jdbcRealm"/>
<ref bean="secondRealm"/>
</list>
</property>
</bean>
|
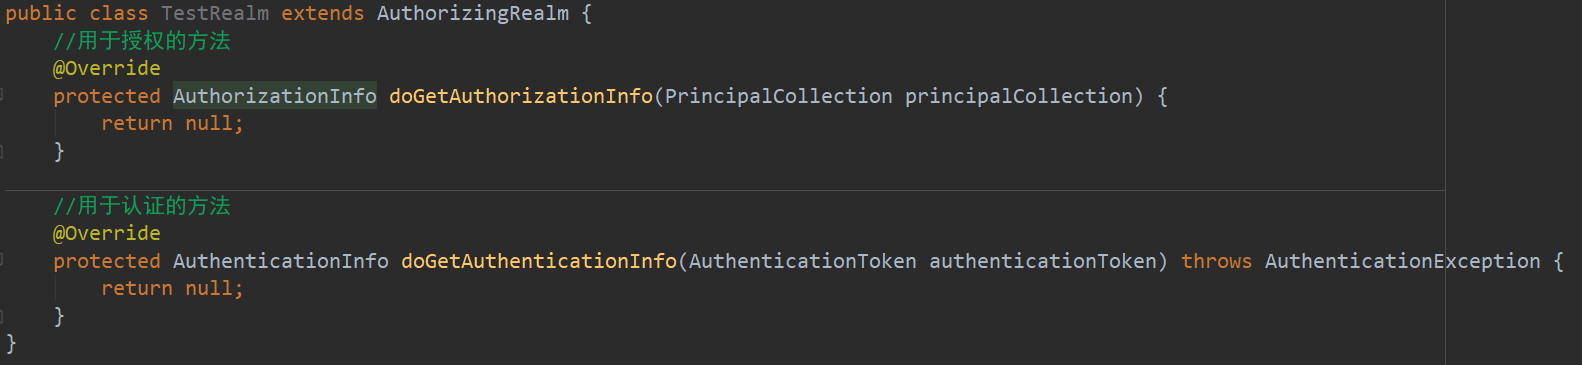
1.授权需要继承 AuthorizingRealm 类,并实现其 doGetAuthorizationInfo 方法;
2. AuthorizingRealm 类继承自 AuthenticatingRealm,但没有实现 AuthenticatingRealm 中的 doGetAuthenticationInfo,所以认证和授权只需要继承 AuthorizingRealm 就可以了,同时实现他的两个抽象方法;
1
2
3
4
5
6
7
8
9
10
11
12
13
14
15
16
17
18
19
20
21
22
23
24
25
26
27
28
29
30
31
32
33
34
35
36
37
38
39
40
41
42
43
44
45
46
47
48
49
50
51
52
53
54
55
56
57
58
59
60
61
62
63
64
65
66
67
68
69
70
71
72
73
74
75
76
77
78
79
80
81
82
83
84
| package com.ShiroDemo.realms;
import org.apache.shiro.authc.*;
import org.apache.shiro.authz.AuthorizationInfo;
import org.apache.shiro.authz.SimpleAuthorizationInfo;
import org.apache.shiro.crypto.hash.SimpleHash;
import org.apache.shiro.realm.AuthenticatingRealm;
import org.apache.shiro.realm.AuthorizingRealm;
import org.apache.shiro.subject.PrincipalCollection;
import org.apache.shiro.util.ByteSource;
import java.util.HashSet;
import java.util.Set;
public class ShiroRealm extends AuthorizingRealm {
@Override
protected AuthenticationInfo doGetAuthenticationInfo(AuthenticationToken token) throws AuthenticationException {
UsernamePasswordToken upToken = (UsernamePasswordToken) token;
String username = upToken.getUsername();
System.out.println("前端表单输入的username:" + username);
System.out.println("从数据库中获取username:" + username + "所对应的数据");
if("unknow".equals(username)){
throw new UnknownAccountException("用户不存在");
}
if("monster".equals(username)){
throw new LockedAccountException("用户被锁定");
}
Object principal = username;
Object credentials = "098d2c478e9c11555ce2823231e02ec1";
String realmName = getName();
ByteSource credentialsSalt = ByteSource.Util.bytes(username);
SimpleAuthenticationInfo info = null;
info = new SimpleAuthenticationInfo(principal,credentials,credentialsSalt,realmName);
return info;
}
public static void main(String args[]){
String hashAlgorithmName = "MD5";
Object credentials = "123456";
Object salt = ByteSource.Util.bytes("user");
int hashIterations = 1024;
Object result = new SimpleHash(hashAlgorithmName,credentials,salt,hashIterations);
System.out.println(result);
}
@Override
protected AuthorizationInfo doGetAuthorizationInfo(PrincipalCollection principals) {
System.out.println("【授权】AuthorizationInfo");
Object principal = principals.getPrimaryPrincipal();
Set<String> roles = new HashSet<>();
roles.add("user");
if("admin".equals(principal)){
roles.add("admin");
}
SimpleAuthorizationInfo info = new SimpleAuthorizationInfo(roles);
return info;
}
}
|
7. Shiro标签
Shiro 提供了 JSTL 标签用于在 JSP 页面进行权限控制,如根据登录用户显示相应的页面按钮。
(1)guest 标签:用户没有身份验证时显示相应信息,即游客访问信息
1
2
3
| <shiro:guest>
欢迎游客访问,<a href="login.jsp">登录</a>
</shiro:guest>
|
(2)user 标签:用户已经经过认证/记住我登录后显示相应的信息
1
2
3
| <shiro:user>
欢迎[<shiro:principal/>]访问,<a href="logout">退出</a>
</shiro:user>
|
(3)authenticated 标签:用户已经身份验证通过,即 Subject.login 登录成功,不是记住我登录的
1
2
3
| <shiro:authenticated>
用户[<shiro:principal/>]已身份较证通过
</shiro:authenticated>
|
(4)notAuthenticated 标签:用户未进行身份验证,即没有调用 Subject.login 进行登录,包括记住我自动登录的也属于未进行身份验证
1
2
3
| <shiro:notAuthenticated>
未身份验证(包括记住我)
</shiro:notAuthenticated>
|
(5)pincipal 标签:显示用户身份信息,默认调用 Subject.getPrincipal() 获取,即 Primary Principal
1
| <shiro:principal property="username"/>
|
(6)hasRole 标签:如果当前 Subject 有角色将显示 body 体内容
1
2
3
| <shiro:hasRole name="admin">
用户[<shiro:principal/>]拥有角色 admin<br/>
</shiro:hasRole>
|
(7)hasAnyRoles 标签:如果当前 Subject 有任意一个角色(或的关系)将显示 body 体内容
1
2
3
| <shiro:hasAnyRoles name="admin,user">
用户【<shiro:principal/>]拥有角色 admin 或 user<br/>
</shiro:hasAnyRoles>
|
(8)lacksRole:如果当前 Subject 没有角色将显示 body 内容
1
2
3
| <shiro:lacksRole name="admin">
用户【<shiro:principal/>]没有角色 admin<br/>
</shiro:lacksRole>
|
(9)hasPermission:如果当前 Subject 有权限将显示 body 体内容
1
2
3
| <shiro:hasPermission name="user:create">
用户【<shiro:principal/>]拥有权限user:create<br/>
</shiro:hasPermission>
|
(10)lacksPermission:如果当前 Subject 没有权限将显示 body 体内容
1
2
3
| <shiro:lacksPermission name="org:create">
用户【<shiro:principal/>]没有权限org:create<br/>
</shiro:lacksPermission>
|
8. Shiro权限注解
